Install RBoot HP Compaq Elite 8300 USDT
!!BACKUP everything!! just in case something fails.
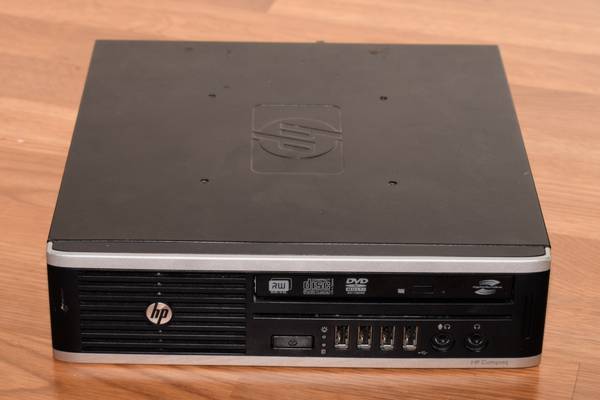
| Specifications | |
|---|---|
| Manufacturer | HP |
| Name | Compaq 8300 Elite USDT |
| Released | 2012 |
| Chipset | Intel Q77 |
| CPU | LGA 1155, Intel Sandy/Ivy Bridge |
| Graphics | Intel HD 3000/4000 + MXM gpu |
| Memory | 16GB DDR3L SODIMMs (2x8GB) |
| Architecture | x86-64-v2 (+ older) (v1 for Sandy) |
| Intel ME/AMD PSP | Present. |
| Flash chip | SOIC-16 16MiB |
Get the ROM image
Download from release
Build from source
./mk -b coreboot hp_elite_8300_usdt_16mb_uefiInternal/Software Flashing
Internal flashing is possible. OEM BIOS versions 2.87, 2.90, 2.99, and 3.08 are confirmed compatible with this guide. BIOS 2.05 is confirmed not to work.
If you have some other BIOS version, please do tell about it on IRC or comment on this issue, so this guide can be updated.
The jumper labelled “FDO” (for Flash Descriptor Override) needs to be shorted. That removes all write protections on this board.
We can borrow a shunt from another header on the board: PSWD. It is right next to the SO-DIMM RAM slots. Move it to the FDO header between the quartz crystal (small metal cylinder) and the power cable for the optical drive.
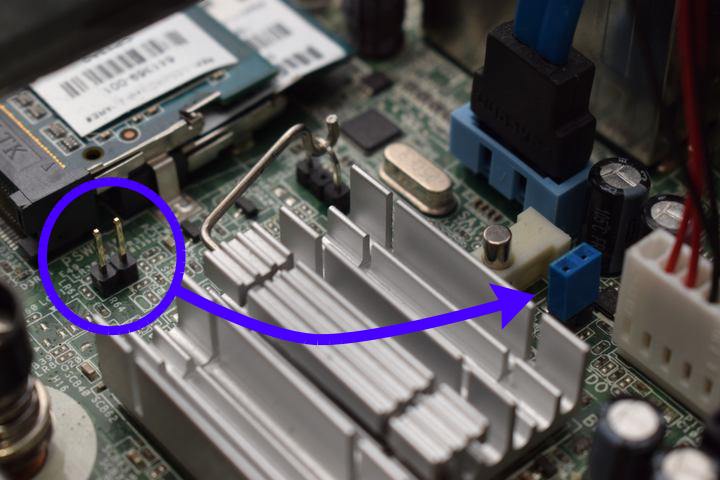
The BIOS should no longer impose any write-protections.
After the jumper set, Backup the vendor firmware before, but DO NOT flash it directly like at the end of the referred guide.
You can now move the jumper back to its original place. By default, RBoot applies no write-protection, so updating it can be done without the jumper anyway.
External/Hardware Flashing
Unbricking is possible by external flashing. You first need to remove the optical disk drive and 2.5" HDD/SSD and the metal bracket that supports them. This requires you to open one torx (T15) screw in total.
The SOIC-16 flash chip is located on the edge of the board near the group of yellow cubes. Follow the hw-flashing guide.
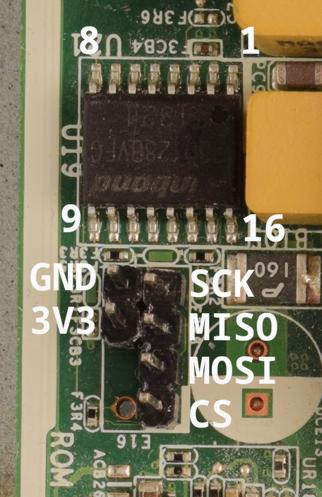
You might need to power the board by plugging it in. In that case, do not connect the Vcc (3v3) pin of the flash chip. Also make sure the board doesn’t fully power on (that is, boot).
If you don’t have a suitable clip, you can also use the ROM_RCVRY header right next to the flash chip. By default only the footprint is present, so you have to solder a pin header of your own. End result can be seen and the pinout can be seen in the photo earlier. Consult the HP service manual (page 241) on how to remove the motherboard from the chassis.
http://web.archive.org/web/20210305234331/https://h10032.www1.hp.com/ctg/Manual/c03612798.pdf
If you do this, you have to reapply thermal paste. That might be a good idea anyway, considering how old these are getting
Set MAC address
This platform uses an Intel Flash Descriptor, and defines an Intel GbE NVM region. As such, release/build ROMs will contain the same MAC address. To change the MAC address, please read nvmutil documentation.
Upgradable (socketed) GPU
If a MXM gpu is installed, all three monitor ports should be active. The igpu will use the top DisplayPort and the MXM gpu will operate the bottom DisplayPort & VGA. (Untested)
It should be possible to use both gpus in a dual-gpu setup.
Expanded_Specifications
Markdown file for this page: https://rboot.org/docs/install/hp8300usdt.md
This HTML page was generated by the Rboot Static Site Generator.